Showing posts with label upcycled. Show all posts

1.30.2012

Agustina Woodgate: Upcycled Stuffed Animals

Agustina Woodgate is the artist behind these stunning and one-of-a-kind rugs made of stuffed animal skins. I think it is an excellent use of discarded stuffed animals. I'm imagining the hours and hours going into deconstructing the stuffed animals. What a process. Check out more of her wide-ranging art projects here.


via

12.01.2011

Nicola Ginzel: Embroidered Everyday Ephemera

I am inspired by Nicola Ginzel's embroidery art. Her work adds meaning and preciousness to somewhat mundane items that would normally be discarded. So Beautiful!


11.21.2011

Ivano Vitali: Knitted Paper Art

Since 2005 artist, Ivano Vitali, has been creating art from up-cycled newspapers. Each page is processed into yarn without the use of dyes or glue. I love playful scale of his works, especially the sock. His knitting needles are amazing. I can't wait to see what he makes next!


7.21.2011

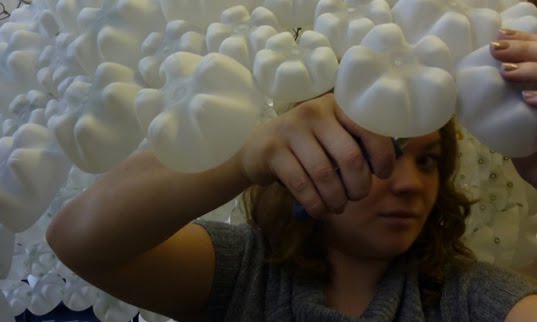
Upcycled Chandelier Lighting Inspiration

The clever Sarah Turner created this beautiful lighting solution out of sand blasted plastic bottle bottoms. Simple shapes in repeition have a gorgeous effect that reminds me of some kind of sea creature. More on Sarah and her eco art here.


via inhabit

10.11.2009

DIY Crochet Rug Made of Sheets


Woah. So I've been mia for awhile now. I think I'm going through an anti-social phase, but don't worry I still have lots of cool DIY decor to share. I have been busy making little projects for the new house. The first one I want to share with you is this crocheted bath mat I made out of old sheets. The basic idea is to rip your old sheets and fabrics into strips and then crochet with those strips. Just to give you a general idea this bathmat was about 3/4 of a full size sheet. I liked the ripping part of this project. I was able to take out a lot of aggression on the one sheet!

I wanted to keep the bathmat quiet because of all the patterns already happening in the bathroom. I debated for a long time on how to finish the mat. I ended up going with a red trim to make it stand out from the floor just enough.

The texture of the rug is really beautiful and functional as well. It is actually really cushy and comfortable to stand on. And the best part, you can just throw it in the washer/dryer when it starts getting funky.

7.11.2009

Eco Laptop Sleeve


This is one of my latest custom creations for a customer in Germany. I like the way it turned out so I wanted to share.

12.18.2008

Get Out Da Way!


I recently made this really cute padded camera pouch for one of my etsy customers. I really like the way it turned out so I wanted to share it with you. I applied the same padding method that I use for my laptop bags for the camera pouch. I basically made several horizontal pockets that are stuffed with plastic remnants. The inside is lined with upcycled tee-shirt.

Sorry of the lack of posts lately, all of my energy has been focused on another project that I will talk about soon!

11.30.2008

Upcycled Tire Tote

This ingenious tote is made of upcycled truck inter tubes. Each purse has unique markings from the tread that carries stories from the past. I saw this bag over on Modern Craft Blog, but you can buy it at violet.com. Just my style!

9.29.2008

Scrap Wood Furniture


I'm totally loving the raw aesthetic of these pieces by Piet Hein Eek. The collaged wood reminds me alot of my fused plastic pieces.

9.12.2008

Upcycled belts make cool stuff


I found out about this from Modern Craft Blog. Basically, a london based design company takes old belts and makes them into 12 x 12 floor tiles. The rich textures the belts great make a beautiful classic effect. Gorgeous!

9.08.2008

Look what I made: DIY tee-shirt dress


Making this tee-shirt dress has turned out to be quite the adventure. I started with one ginormous grey tee-shirt and then a smaller pink tee shirt that I used as the accent color. The first step was to cut the sides of the grey shirt so that the tee-shirt would fit snugger. I'm lazy so I totally winged this step. If I were to do it again I would leave more room in the armpit area. Sew the side seam inside-out and try on.

The next step is to cut the belt out of your accent fabric. I decided to use the part of the shirt with the type which adds a nice graphic element. Once you sew the front and the back strips of the belt together try on both pieces to decide how far down the belt should go. Cut your tee shirt dress in half where the belt goes. Line up the good sides together and sew the belt to the top. Take your time figuring out which sides go together. It ended up taking me 3 tries to get it right. (Sometimes I can get in too much of a hurry)

The pockets were inspired by the accidental hole I cut into the shoulder. I needed something to cover up my mistake and the pockets ended up being a really nice touch. I put the straps in because the dress was falling off of my shoulders more than I wanted it to. Functional and cute! Overall I'm very happy with the way it turned out.

I hope this inspires you to make something out of your old tee-shirts!